Handling Flutter Loading States Like a Pro
Learn how to manage loading states in Flutter applications using Riverpod for better user experience and state management.
Why loading states matter more than you think
When building modern Flutter apps, handling loading states gracefully is more than just a nice-to-have — it’s essential to creating a smooth and polished user experience. Yet, many developers still rely on outdated or repetitive approaches that can lead to clunky UI transitions and bloated widget trees. In this article, I’ll show you how to elevate your loading state management using Riverpod and the skeletonizer package. You’ll learn how to streamline your code, improve consistency across screens, and deliver delightful, responsive interfaces that feel professional from the very first frame.
Typical approach
Throughout my career, working on over a dozen projects, I’ve noticed the same pattern used over and over:
1
2
3
4
5
6
7
Widget build() {
   // ....
   if(state.isLoading) {
       return Center(child: CircularProgressIndicator());
   }
   // ....
}
While there’s nothing terribly wrong with this approach, it does come with a few downsides:
- Repetitive code – In my experience, around 70–80% of screens follow this logic.
- Jarring layout shifts – Replacing the whole content causes noticeable jumps in the UI, which doesn’t look great.
Luckily, with Riverpod and the skeletonizer package, we can improve both the user experience and developer experience — a win-win!
Using Riverpod
For the sake of this post let’s create a simple cooking recipe app:
1
2
3
4
5
6
7
8
9
10
11
12
13
14
15
16
17
18
19
20
21
22
23
24
25
26
27
28
29
30
31
32
33
34
35
36
37
38
39
40
41
42
43
44
45
46
47
48
49
50
51
52
53
54
55
56
57
58
59
60
import 'package:flutter/material.dart';
import 'package:flutter_riverpod/flutter_riverpod.dart';

final recipeProvider = FutureProvider.autoDispose<List<String>>((ref) async {
  // Simulate a network call delay
  await Future<void>.delayed(const Duration(seconds: 3));

  return [
    'Spaghetti Carbonara',
    'Chicken Tikka Masala',
    'Beef Stroganoff',
    'Vegetable Stir Fry',
    'Grilled Salmon with Lemon',
    'Classic Caesar Salad',
    'Mushroom Risotto',
    'Pulled Pork Sandwiches',
    'Eggplant Parmesan',
    'Thai Green Curry',
  ];
});

class RecipesPage extends ConsumerWidget {
  const RecipesPage({super.key});

  @override
  Widget build(BuildContext context, WidgetRef ref) {
    final recipesAsyncValue = ref.watch(recipeProvider);

    return Scaffold(
      appBar: AppBar(title: Text("Recipes")),
      body: Builder(
        builder: (context) {
          final recipesValue = recipesAsyncValue.valueOrNull;
          if (recipesValue == null) {
            return const Center(child: CircularProgressIndicator());
          }

          final recipes = recipesValue;

          return RefreshIndicator(
            onRefresh: () => ref.refresh(recipeProvider.future),
            child: ListView.builder(
              itemCount: recipes.length,
              itemBuilder: (context, index) {
                final recipe = recipes[index];

                return ListTile(
                  title: Text(recipe),
                  onTap: () {
                    ScaffoldMessenger.of(context).showSnackBar(SnackBar(content: Text('Selected: $recipe')));
                  },
                );
              },
            ),
          );
        },
      ),
    );
  }
}
Currently this loading implementation looks like this:

Improving loading state handling with custom loader widget
Riverpod’s FutureProvider (and similar classes) return an AsyncValue<T>, which gives us powerful tools to handle loading, errors, and data—all in one. We can build a simple widget that accepts an AsyncValue<T> and a builder for the loaded T:
1
2
3
4
5
6
7
8
9
10
11
12
13
14
15
16
17
18
19
20
21
22
23
24
class AsyncLoader<T> extends StatelessWidget {
  const AsyncLoader({
    required this.asyncValue,
    required this.builder,
    super.key,
  });

  final AsyncValue<T> asyncValue;
  final Widget Function(T data) builder;

  @override
  Widget build(BuildContext context) {
    if (asyncValue.isLoading) {
      return const Center(
        child: CircularProgressIndicator(),
      );
    } else if (asyncValue.hasError) {
      // Show nice looking error message here
      return Center(child: Text('Error: ${asyncValue.error}'));
    } else {
      return builder(asyncValue.value);
    }
  }
}
But we can take it even further! We can leverage skeletonizer package to show beautiful loading animation that will resemble shape of data that you will see. To do that we have to add argument with mock data to our widget:
1
2
3
4
5
6
7
8
9
10
11
12
13
14
15
16
17
18
19
20
21
22
23
24
25
26
27
28
29
30
31
32
33
34
35
class AsyncLoader<T> extends StatelessWidget {
  const AsyncLoader({
    required this.asyncValue,
    required this.mockData,
    required this.builder,
    this.enableSwitchAnimation = true,
    super.key,
  });

  final AsyncValue<T> asyncValue;
  final T mockData;
  final Widget Function(T data) builder;
  final bool enableSwitchAnimation;

  @override
  Widget build(BuildContext context) {
    if (asyncValue.hasError) {
      return Center(
        // Show nice looking error message if the async data has an error
        child: Text('Error: ${asyncValue.error}'),
      );
    }

    final data = switch (asyncValue) {
      AsyncData<T>(value: final v) => v,
      _ => mockData,
    };

    return Skeletonizer(
        enabled: !asyncValue.hasValue,
        enableSwitchAnimation: true,
        child: builder(data),
    );
  }
}
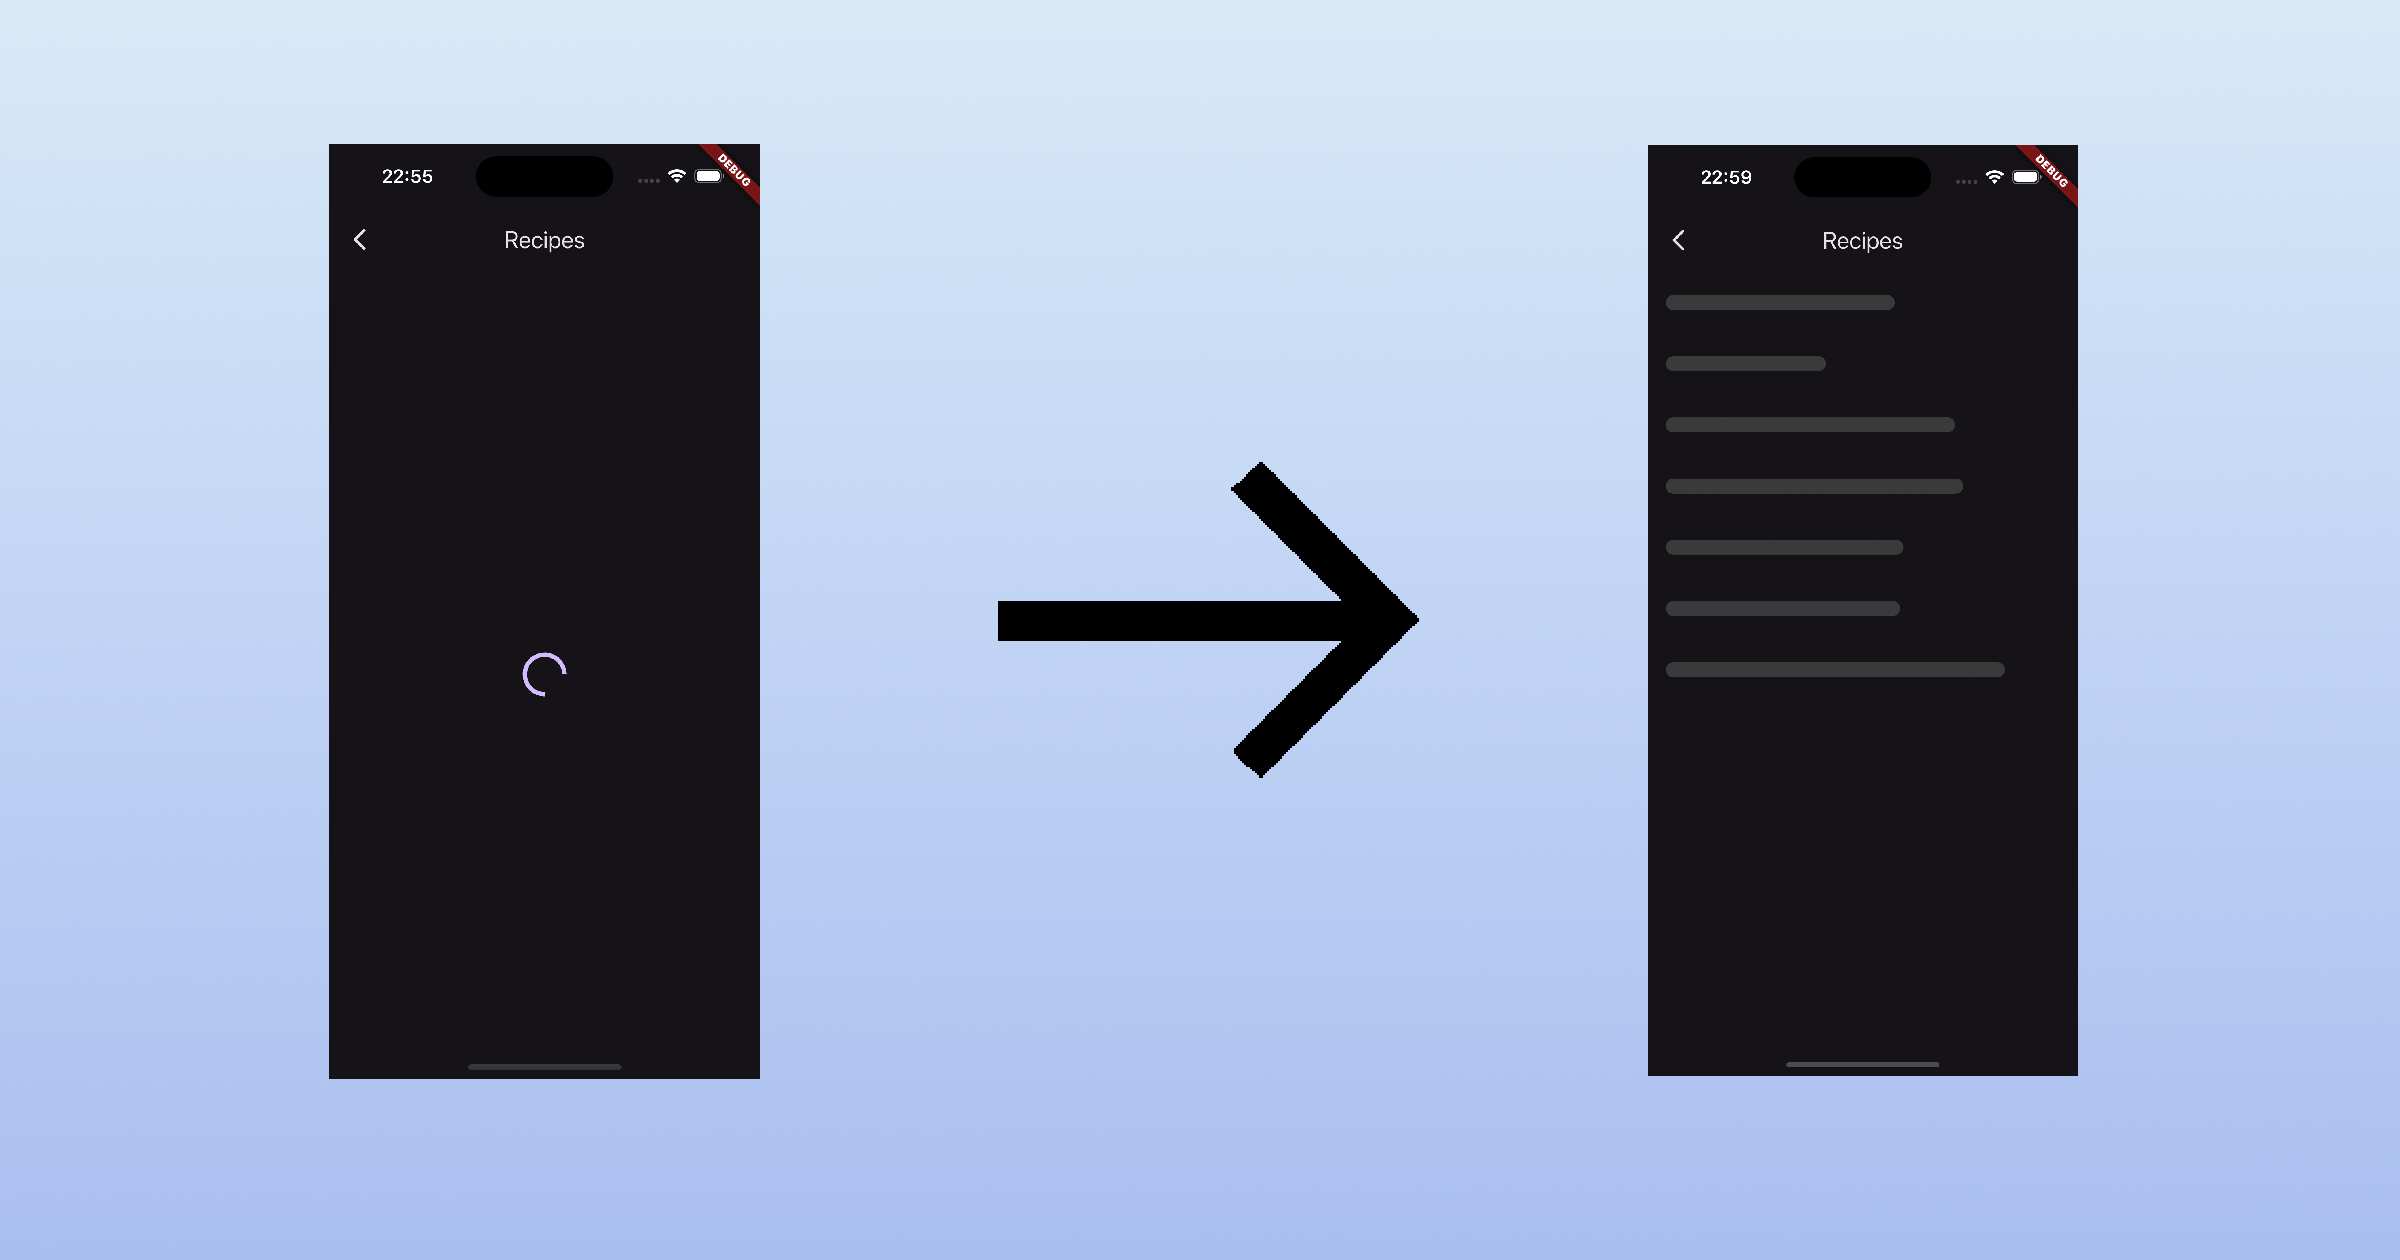
The result?
A beautiful animated loading state, and much cleaner code:

1
2
3
4
5
6
7
8
9
10
11
12
13
14
15
16
17
18
19
20
21
22
23
24
25
26
27
28
29
30
31
32
33
34
35
36
37
38
39
40
41
42
class RecipesPage extends ConsumerWidget {
  const RecipesPage({super.key});

  @override
  Widget build(BuildContext context, WidgetRef ref) {
    return Scaffold(
      appBar: AppBar(title: const Text('Recipes')),
      body: Builder(
        builder: (context) {
          return RefreshIndicator(
            onRefresh: () => ref.refresh(recipeProvider.future),
            child: AsyncLoader(
              asyncValue: ref.watch(recipeProvider),
              mockData: const [
                'Long recipe name 123 123',
                'Short recipe name',
                'Use names with different lengths',
                'to create a more realistic skeleton',
                'This is a mock recipe name',
                'Another mock recipe name',
                'Mock recipe name with a longer length',
              ],
              builder: (recipes) => ListView.builder(
                itemCount: recipes.length,
                itemBuilder: (context, index) {
                  final recipe = recipes[index];

                  return ListTile(
                    title: Text(recipe),
                    onTap: () {
                      ScaffoldMessenger.of(context).showSnackBar(SnackBar(content: Text('Selected: $recipe')));
                    },
                  );
                },
              ),
            ),
          );
        },
      ),
    );
  }
}
Benefits of this approach
- Cleaner code: No more repetitive loading checks scattered across your widgets.
- Centralized error handling: Handle loading state errors in one place, making it easier to maintain and update.
- Consistent loading experience: The skeletonizer package provides a consistent and visually appealing loading state that matches the shape of your data.
- Improved user experience: Users see a smooth transition from loading to content, without jarring layout shifts.
- Easier maintenance: If you need to change the loading state, you only need to update the
AsyncLoaderwidget.
Things to keep in mind
- Mock data: Ensure that the mock data you provide resembles the actual data structure to create a realistic skeleton. When you have to provide text, consider using a mix of short and long strings to create a more varied look.
- Excluding and merging widgets in skeleton: If you have widgets that should not be skeletonized (like buttons), you can wrap them in a
Skeleton.ignore, for more usage examples check the skeletonizer documentation.
Full code example
1
2
3
4
5
6
7
8
9
10
11
12
13
14
15
16
17
18
19
20
21
22
23
24
25
26
27
28
29
30
31
32
33
34
35
36
37
38
39
40
41
42
43
44
45
46
47
48
49
50
51
52
53
54
55
56
57
58
59
60
61
62
63
64
65
66
67
68
69
70
71
72
73
74
75
76
77
78
79
80
81
82
83
84
85
86
87
88
89
90
91
92
93
94
95
96
97
98
99
100
import 'package:flutter/material.dart';
import 'package:flutter_riverpod/flutter_riverpod.dart';
import 'package:skeletonizer/skeletonizer.dart';

final recipeProvider = FutureProvider.autoDispose<List<String>>((ref) async {
  // Simulate a network call delay
  await Future<void>.delayed(const Duration(seconds: 3));

  return [
    'Spaghetti Carbonara',
    'Chicken Tikka Masala',
    'Beef Stroganoff',
    'Vegetable Stir Fry',
    'Grilled Salmon with Lemon',
    'Classic Caesar Salad',
    'Mushroom Risotto',
    'Pulled Pork Sandwiches',
    'Eggplant Parmesan',
    'Thai Green Curry',
  ];
});

class RecipesPage extends ConsumerWidget {
  const RecipesPage({super.key});

  @override
  Widget build(BuildContext context, WidgetRef ref) {
    return Scaffold(
      appBar: AppBar(title: const Text('Recipes')),
      body: Builder(
        builder: (context) {
          return RefreshIndicator(
            onRefresh: () => ref.refresh(recipeProvider.future),
            child: AsyncLoader(
              asyncValue: ref.watch(recipeProvider),
              mockData: const [
                'Long recipe name 123 123',
                'Short recipe name',
                'Use names with different lengths',
                'to create a more realistic skeleton',
                'This is a mock recipe name',
                'Another mock recipe name',
                'Mock recipe name with a longer length',
              ],
              builder: (recipes) => ListView.builder(
                itemCount: recipes.length,
                itemBuilder: (context, index) {
                  final recipe = recipes[index];

                  return ListTile(
                    title: Text(recipe),
                    onTap: () {
                      ScaffoldMessenger.of(context).showSnackBar(SnackBar(content: Text('Selected: $recipe')));
                    },
                  );
                },
              ),
            ),
          );
        },
      ),
    );
  }
}

class AsyncLoader<T> extends StatelessWidget {
  const AsyncLoader({
    required this.asyncValue,
    required this.mockData,
    required this.builder,
    this.enableSwitchAnimation = true,
    super.key,
  });

  final AsyncValue<T> asyncValue;
  final T mockData;
  final Widget Function(T data) builder;
  final bool enableSwitchAnimation;

  @override
  Widget build(BuildContext context) {
    if (asyncValue.hasError) {
      return Center(
        // Show nice looking error message if the async data has an error
        child: Text('Error: ${asyncValue.error}'),
      );
    }

    final data = switch (asyncValue) {
      AsyncData<T>(value: final v) => v,
      _ => mockData,
    };

    return Skeletonizer(
        enabled: !asyncValue.hasValue,
        enableSwitchAnimation: true,
        child: builder(data),
    );
  }
}
Let your loading states shine and give your users an experience that feels polished from the very first frame.
Happy coding!